Hello and welcome to my Tutorial Blog.

I hope give you inspiration with some some fabulous tutorials.

Friday 30 November 2012

Weaved Hanging Heart

Hi all,

 Today I am going to show you how to make this fabby little Weaved Heart Hanging.
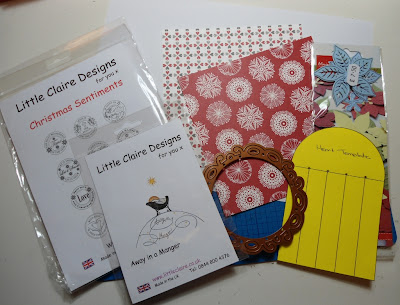


You will need :

Away in a Manger - Clear Stamp
Christmas Sentiments - Clear Stamp Set
2 x Patterned Papers
Flower Die
Fancy Circle Dies
White, Red & Green Card
Ribbon
Heart Template


When printed out - template should measure 14cm tall x 9cm wide

Step 1. Draw round the template and mark out all dimensions on both pieces of paper

 Step 2. Cut out shapes and slit along lines

Step 3. Weave Shapes together


Finshed Weave

Step 4. Stick heart onto White card and trim, leaving a white border


Step 5. Punch a hole in the top of the heart and thread with ribbon. Tie off in a bow to secure

 Step 6. Stamp & colour image and sentiment. Die Cut out using fancy circle dies

Step 7. Die cut out a flower and leaves from red & green card. Put together with a brad

Step 8. Add image, sentiment & flower onto base using foam pads

Thank you for joining me here today, I hope you have enjoyed my little project.

Lyndsey xx

Friday 5 October 2012

Fancy Fold Christmas Star

Hi all

 Today I have gone all christmasy and would like to show you how to make this fabulous Fancy Fold Christmas Star.


You will need


Snowflake Punch
Circle & Scalloped Circle Nesties
6mm Ribbon

Promarkers in the following colours :

Crimson, Ruby & Rose Pink
Olive, Pear Green & Lime Green
Colbalt, Sky Blue & Artic Blue
Mustard & Buttercup


*I have shown the folding on plain paper so that you can see my folds & measurements more clearly*


1. Take a piece of 6x6 paper and fold in half diagonally both ways
(make sure the paper is pattern side down)


2. Fold each corner in towards the centre point


3. Turn the paper over and make a mark on each crease line 2.5cm away from the centre point.

4. Make a cut from each edge towards the 2.5cm mark


5. Make a mark diagonally in each square
(this is for lining up purposes only)


6. Fold each edge in to create a triangle (using the mark as a lining up guide)


7. When finished your paper should now look like this

8. Repeat steps 1 -6 to create another star shape


9. Place on your workspace as shown in the picture above


10. Attach the two stars together


11. Stamp & colour image then Die Cut out using a plain circle nestie

12. Die cut a scalloped circle from coloured card and a sentiment strip

13. Punch 3 snowflakes from glittered card and add a small button to each centre

14. Layer up all items and attach to front of star

15. Finally punch a hole in the top of the star and thread with ribbon


I hope you enjoyed my tutorial

Lyndsey xx

Friday 10 August 2012

Triple Tier Easel Card

Hi all,

Today I am going to show you how to make this Triple Tier Easel Card


To Make this card you will need

2 x A4 White Card 250gsm or above
Set of Scalloped Circle Nesties
Set of Plain Circle Nesties
Promarkers - various colours
Butterfly & Flower punches
Gems


Trim a piece of white card into 3, fold in half and Die Cut out using the 3 largest scalloped nesties. Make sure that part of the nestie overhangs the fold.


You will now have 3 scalloped cards.


 Score a line half way up across the front of each card & fold.


Stick the 3 cards together cascading from largest to smallest


Die Cut 4 scalloped circles from the 2nd sheet of white card


Stamp and colour the Rufus Owl image


Die Cut 3 plain circles & 1 small scalloped circle from patterned papers


Add the papers to each scalloped circle. Add the stamped image and sentiment to the smallest circle.


Attach each Scalloped Circle onto the front of each easel and the sentiment to front card to act as a stopper.


Side View 


Using punches punch Butterflies & Flowers from white card & patterned paper


Add to card for decoration

Well I hope you have enjoyed and been inspired by my tutorial

Lyndsey xx

Friday 1 June 2012

Easy Stepper Card

Hi all,

Today on the Little Claire blog I am going to show you how to make this fabulous Easy Stepper Card


Supplies


For The Card
Joie De Vivre Clear Stamp
Stamped in Memento Ink Black
6x6 Square Card Blank
Coloured Card
Fancy Die Cut Shapes
Promarkers (Ultra fine Nibs) in the following colours :-
Skin - Coral, Dusky Pink, Blush
Hair - Cinnamon, Tan, Satin
Flowers - Burnt Orange, Peach, Soft Peach
Butterflies/Hearts - Antique Pink, Dusky Rose, Budding Rose
Grass - Olive Green, Moss, Pear Green, Lime Green


For the Flowers
Medium Flower Punch
White Card
Flourish Die
Green Card
Embossing Tool
Promarkers in the following colours :-
Burnt Orange, Peach, Soft Peach


Draw feint lines across the card blank - 3cm in from the top, bottom & LH sides.
Draw a feint line across the card blank - 3cm up from the prescored line


Score along the 6 Pink lines
Cut along the 2 Green lines


Mountain & Valley fold the card as shown above


Your card should now look like this


Trim a piece of coloured card to 14.5cm x 2.5cm
& 2 pieces to 11cm x 2.5cm
Trim a piece of patterned paper to 14cm x 2cm
& 2 pieces to 10.5cm x 2cm


Matt these onto the card as shown above


Stamp, colour and Die Cut the image using a fancy shape


Die Cut a larger fancy shape from coloured card


Matt these onto the card blank as shown


Stamp & Die Cut the sentiment


Punch out 5 flower shapes, colour with Peach & Soft Peach promarkers to match the flowers on the image.
Shape flowers with embossing tool & add a Candi coloured with Burnt Orange to each centre.
Die Cut flourish and chop up to add a bit to each flower.


Add all embelishments onto the card as shown above


Side View - to show step better

I hope you enjoyed my tutorial today

Lyndsey xx