Hello and welcome to my Tutorial Blog.

I hope give you inspiration with some some fabulous tutorials.

Monday 27 March 2017

Painted Blooms Sunburst

Good evening everyone,

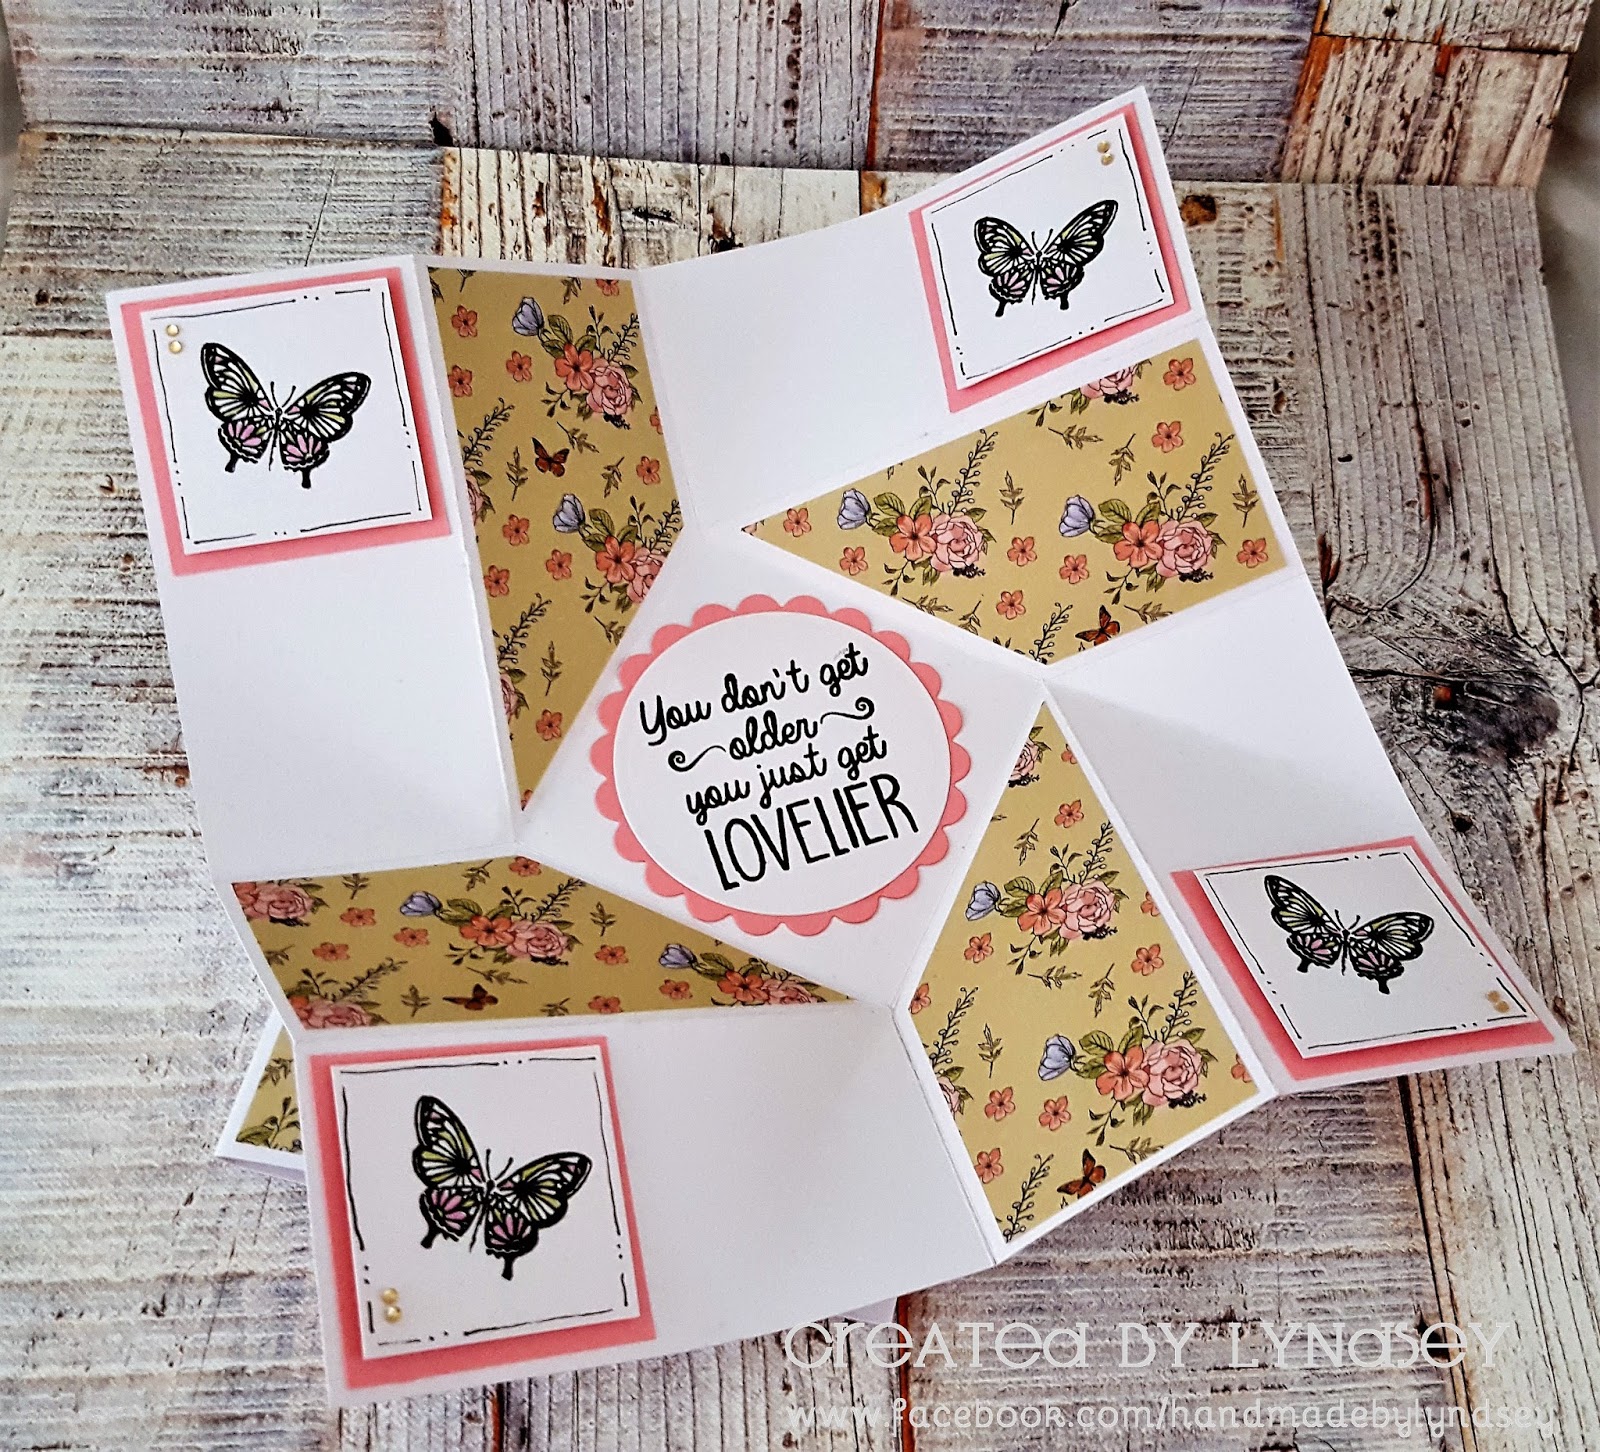
I have shared this pretty Sunburst card over on the main page today, and thought I'd pop the instructions over on here.


Instructions
Trim a piece of white card to 14cm x 14cm

Draw a line across at 6.5cm up from bottom

Trim various pieces of paper to 11.5cm x 4cm and cut in half diagonally 

Arrange papers onto card lining the first one up with the horizontal line
with the tip of the paper about 3/4 of the way across your card

Working from Left to Right until the top half of the card is covered 
(Make sure papers meet at bottom & reach past the card)

Trim a piece of paper to 6.5cm x 14cm and add to the bottom section of the card  
(Cut off the excess paper around the top section)

Wrap a piece of ribbon & lace across the top of the paper join

Mat panel onto a piece of card cut to 14.5cm x 14.5cm, add to the front of a 6x6 card blank

Trim a doiley in half and add to the top section of the card covering where the points of the papers meet

Trim a piece of paper to 5cm x 7cm and cut into a banner shape, add a piece of ribbon to the top

Create a Rosette & add a flower topper to the centre, mat onto the tag
and add on top of the doiley using foams pads

Add a diecut sentiment in bottom LH corner, finish off with a few randomly placed gems

-------------------------------------

Thanks for popping by today

Lyndsey

Tuesday 7 March 2017

Twist Fold Card

Good evening everyone,

Over on the main page today I've shared this cute Twist Fold Card and thought I'd pop the instructions up on here.


At first glance it looks like a cute little 4 panelled card, however remove the band and pull open to reveal a hidden sentiment😊


When opened fully it measures approx 8" sq


Instructions


Trim a piece of card to 20cm x 20cm
Draw feint lines across & down at 5cm, 10cm & 15cm 
Score lines diagonally in the center squares to create a diamond shape
Score the 10cm lines from each point of the diamond to the edge of the paper
In the top LH corner score the 5cm line down to the diamond point
In the top RH corner score the 15cm line across to the diamond point
In the bottom LH corner score the 5cm line across to the diamond point
In the bottom RH corner score the 15cm line up to the diamond point
(see diagram for folds)
Fold the 10cm lines as valley folds & Fold the 5cm & 15cm as mountain folds
Fold the card into shape - (folding clockwise)
Trim 2 pieces of paper to 4.5cm (wide)x 9.5cm (tall)
Trim to fit diagonal and add to the card top LH & bottom RH
Trim 2 pieces of paper to 9.5cm (wide) x 4.5cm (tall)
Trim to fit diagonal and add to the card bottom LH & top RH
Trim 4 pieces of white card to 4cm x 4cm - stamp image on each
Mat onto coloured card 4.5cm x 4.5cm - add to each corner of card
Trim a strip of card to 3cm tall - fold & secure to create a band
Trim a piece of paper to 2.5cm x 10cm & add to the band
Stamp 2 x sentiment, die cut and mat onto coloured card
Add one to the center of diamond and one to the band
-------------------------------------

Hope you enjoy this tutorial

Thanks for popping by my blog today

Lyndsey xx


Wednesday 1 March 2017

Internal Pop Out Butterfly Card

Good morning everyone,

Today over on the Main Blog I'm sharing this pretty Internal Pop Out Card and thought I share the instructions with you over here 😊


Instructions

Trim a piece of coloured card to 19cm x 14cm
Score lines along the longer edge down at 7cm, 9.5cm & 12cm
Mountain fold the 9.5cm score, and valley fold the other 2
Stick inside an A6 card blank, so the inside pops out (Alternative trim a DL card down to 15cm tall)
Trim 2 pieces of white card to 13.5cm x 6.5cm and attach to the inside of the card
Trim 2 pieces of coloured card to 7cm x 4.5cm & 1 to 7cm x 4cm
Trim 2 pieces of white card to 6.5cm x 4cm & 1 to 6.5cm x 3.5cm
Attach together and stick to the pop out section of the card - 2 on the LH side & 1 on the RH side
Trim a piece of white card to 8.5cm x 13.5cm
Emboss card using amnembossing folder, mat onto coloured card cut to 9cm x 14cm and add to card front
Trim a piece of paper to 3.5cm x 8.5cm & mat onto coloured card cut to 4cm x 9cm - add to card front towards the bottom
Cover the back of a wooden frame with paper,  Add to the card front on the patterned strip & place a sentiment topper overhanging
Die cut various butterflies, and attach to pop out sections and front of card
---------------------------------------------------
Hope you enjoy making this card, thanks for popping by today
Lyndsey xx

Monday 20 February 2017

Herringbone background design

Hello everyone,

Today over on the Main Blog I have shown this beautiful Butterfly card made using the Herringbone pattern technique for the background papers. I thought I'd pop it on here with the instructions


    Instructions
    Trim a piece of card to 10 cm x 25cm, score in half to make a card blank
    Trim a piece of plain pink card to 9.5cm x 12cm and add to card front using foam pads
    Trim a piece of white card to 9cm x 11.5cm
    Cut various strips of paper to 1.5cm wide
    Add 3 strips of paper to the card panel as shown in diagram, creating 4 triangle areas on the card
    Use the remaining paper to fill in each area - (leaving a small gap between each piece is optional)
    Trim off any overhang and add the panel to the card front
    Stamp the 'Happy Birthday senitment onto white card, carefully trim around the border and add to the bottom RH side of the card using foam pads
    Stamp the butterflies onto card, carefully cut out and add to the card with foam pads
    Finish off with a few randonly placed gems

    Thanks for popping by today
    Lyndsey xx

Wednesday 15 February 2017

Free Standing Pop Up Card

Hello,

Sharing how to make this Free Standing Pop card today as shown over on the Main Blog


Instructions

Trim a piece of card to 28cm x 14.5cm

Score lines down at 2.5cm, 7cm, 9.5cm 14cm, 18.5cm, 21cm & 25.5cm

At the 14cm line - measure 2cm from each edge
and trim away a small section from either side of the scoreline

Trim 4 pieces of paper to 14cm x 4cm & add to the 4.5cm wide sections

Trim 2 pieces of paper to 14cm x2cm & add to the 2.5cm wide sections

Trim a piece of card to 10cm x 15cm

Trim a piece of paper to 9.5cm x 14.5cm & add to card

Slot the card piece through the gap and stick the card together

Wrap ribbon around the top front section and tie a bow

Make up decoupage and add to front pop up panel

Finish off with flowers, gems etc for decoration

---------------------------------------------

Thank you for popping by today

Lyndsey xx

Thursday 9 February 2017

Kite shaped Explosion Card

Hi everyone,

Today I have the measurements and instructions to make this cute Kite shaped Explosion Card that I've shared over on the main blog today 😊


Instructions

Trim a piece of A4 white card to 12cm tall (leaving the length)

Score, Fold & Cut as per the diagram shown above in the pictures

Trim 2 pieces of paper to 5.5cm x 9cm & 2 pieces to 5.5cm x 5.5cm - trim off diagonally to fit shape and add to the front of the card

Trim 2 pieces of paper to 5.5cm x 5.5cm, trim diagonally to fit and add to inside of the card

Tape a piece of twine to the inside back of the card at the bottom

Trim a piece of paper to fit the inside of the card shape (I did mine just by lining the paper up and measuring that way - not actual measurements)

Stamp the sentiment, Die cut and add to the card - decorate with a selection of flowers

Tie ribbon bows around the twine kite tail to finish

Lyndsey xx


Sunday 5 July 2015

Gate Fold Explosion Card

Hi all,

Popping on today to give you the instructions on how to make this fabby Exploding Gate Fold Card.


Thanks for popping by today

Lyndsey xx

Saturday 6 June 2015

Pocket Card with Pull out Tag

Hi all,

Today I thought I would share the instructions on how to make this cute little Pocket Card


Wednesday 22 April 2015

Double Aperture Card

Hi all,

Popping on today with instructions on how to make this fabby Double Aperture Card


Saturday 18 April 2015

Pop Front Gatefold Card

Hi all,

Today I have the instructions to show you to make this fabby Pop Front Gatefold Card


Friday 17 April 2015

Double Pocket Circular Card

Hi all,

Thought I'd pop on today with instructions on how to make this fabby Double Pocket Circular Card.


The base is made from a piece of 12" x 12" Double Sided paper, which is cut into a 25cm circle - scored, cut & folded into shape

Here are the Measurements & Instructions


Thursday 19 December 2013

3D Triangle (Teepee) Card

Hi all,

Today I have tutorial on how to make this cute little 3D Triangle Card


Items
Image - All Dressed Up For Christmas
White Card
3 x pieces of patterned paper
Plain Oval Die 
Fancy Oval Die
Promarkers (colours listed below)
Flowers, Ribbon & Embellishments

Step 1 - Trim 3 pieces of Card to 14cm x 14cm

Step 2 - Score in half diagonally and fold

Step 3 - Trim 3 pieces of paper to 13cm x 13cm & trim in half Diagonally

Step 4 - Attach papers to each card base

Step 5 - Adhere the 3 panels together as shown
Panel 1 - LH side (bottom) score line going bottom left to top right
Panel 2 - RH side (bottom) score line going top left to bottom right
Panel 3 Middle (top) score line going vertically

Step 6 - Add a one side of a piece of velcro fastening to the LH panel as shown in the picture

Step 7 - Turn the card over and add the other side of a piece of velcro to the top LH corner

Step 8 - Fold the card together and stick closed with the velcro

Step 9 - Print & colour image, Die Cut out using a Plain Oval Die
Die Cut a Fancy Oval from green card

------------------------------------------
Promarker Colours
Skin - Coral, Soft Peach, Oatmeal, Blush
Hair - Burnt Sienna, Cinnamon, Tan, Satin 
Dress - Burgundy, Cardinal, Antique Pink, Dusky Rose, Budding Rose
Tree - Pine, Olive Green, Marsh Green, Moss
Presents - Raw Sienna, Caramel, Sandstone, Vanilla
Burgundy, Antique Pink, Dusky Rose, Budding Rose
---------------------------------------------

Step 10 - Adhere to the card front as shown in the picture

Step 11 - Finish off with flowers, ribbon & embellishments of your choice


Thanks for joining me here today, hope you have enjoyed my tutorial. 

Lyndsey xx

Monday 16 December 2013

Opening Purse Box - Instructions

Hi all,

Thought I'd pop on today with the instructions to make this cute little Purse Box.


The box is made using a 12 x 12 piece of card and scoring into shape. The flap was created using a scalloped circle nestie, stuck to the back and a little velcro on the front so that it can be opened.  

Here are the instructions and measurements


Lyndsey xx

Tuesday 19 November 2013

Buckle Card Tutorial

Hi all,

Today I have tutorial on how to make this cute little Buckle Style Card.


You will need the following items

6x6 Card Blank
3 x Patterned Papers
A4 sheet Coloured Card
Colouring Medium (I used Promakers - colours listed below)
Fancy Oval & Plain Oval Dies
Corner Rounder Punch
Embellishments (as prefered)
& obviously basic supplies

1. Trim a 4cm piece away from the LH side of the card blank

2. Take this piece and score across at 5cm from the bottom (this will be your buckle)

3. Round the corners of the Buckle on the longer side

4. Trim a piece of paper to 9cm x 3cm & a piece of card to 9.5cm x 3.5cm
Round the corners of each piece

5. Mat together and attach to Buckle - also adding tape to the RH side

6. On the RH side of your card draw a line across 2cm up from the bottom.
On the LH side of the card draw 2 lines across at 2cm & 6cm up from the bottom
& 1 line vertically 3cm in from the LH edge

 7. Attach the Buckle to the RH side of the card, using the line you drew for placment 

8. Trim a piece of paper to 13.5cm x 13.5cm & mat onto card cut to 14cm x 14cm
Trim another piece of paper to 10cm x 13.5cm & mat onto card cut to 10.5cm x 14cm

9. Add the large panel to the inside back of your card (this will also cover the back of the buckle)

10. Add the smaller panel to the outside front of your card

11. Using the lines on the back of the LH side of the card as a guide, trim out a small window (this will create the slot where you feed the buckle through)

12. Print & colour image. Die cut out using a plain Oval Die

--------------------------------------------
Promarkers used

Skin - Coral, Soft Peach, Oatmeal, Blush
Hair - Cocoa, Raw Sienna, Mustard, Buttercup
Dress, Shoes & Hair Clips -  Maroon, Cardinal, Antique Pink, Dusky Rose, Budding Rose
Rabbit & Star - Cocoa, Caramel, Sandstone, Vanilla
Large Present - Cardinal, Antique Pink, Cocktail Pink
Med Present - Olive, Marsh Green, Moss, Pear Green
Small Present - Antique Pink, Cocktail Pink, Pastel Pink
Grounding - Warm Grey 5,3,1 & Blender
------------------------------------------------

13. Die cut a Fancy Oval from coloured card


14. Mat together and add to the front of the card (taking care not to add any adhesive where the image covers the slot)

15. Decorate card with embellishments of your choice
To close the card you will push the buckle underneath the image and through the slot


Hope you enjoyed the tutorial

Lyndsey xx